How to Set Up a Microsoft Exchange Server on Kamatera
Microsoft Exchange Server is a robust software solution developed by Microsoft for email, calendaring, contact management, and collaboration. It is designed to meet the communication and organizational needs of businesses by providing a platform for efficient information sharing and coordination. With features such as email processing, shared calendars, mobile device support, web access, voicemail integration, and instant messaging, Exchange Server enhances productivity and connectivity within an organization.
Here are the steps to set up Microsoft Exchange on your Kamatera cloud server.
To set up Microsoft Exchange Server, it’s essential to have the right hardware and software, including key software components like
Active Directory
DNS Server roles
Windows Server operating systems with the Active Directory Domain Service role, known as AD domain controllers, are crucial to have, as they authenticate and authorize users and computers in a Windows domain network. These controllers manage security policies, install or update software, and verify user credentials during logins, determining user roles such as system administrators or normal users. They also facilitate the management and storage of information, provide authentication and authorization mechanisms, and establish a framework for deploying related services.
Deploying Exchange Server begins with preparing Active Directory Domain Services because Exchange relies on Active Directory for storing product information and user account settings. Active Directory’s replication mechanism ensures a unified configuration across all Exchange infrastructure, enabling seamless server interactions.
For the deployment to be successful, the computer running Exchange Server must be connected to a domain, necessitating the configuration of the internal Active Directory domain. This process starts with setting up the first server to ensure system integrity. Assigning a specific name and setting a static IP address for this computer are essential steps before installing the Active Directory Domain Service role.
Click on the Start button and select System.
A new screen will open. Click on Rename this PC, and a dialog box will open.
Enter a name for your PC and, click Next.
Note: The system will notify you that renaming the computer requires a restart.
Configuring Network Settings
To configure network settings, right-click on the Start menu or press the Windows + X keys on your keyboard and choose Network Connections.
A new screen will open. Click on Change Adapter Options.
From the Ethernet, right click on Properties.
A new screen will open. Click on Internet Protocol Version 4.
Click on Properties. A new screen will open.
Click on the Use the following IP address radio button and fill in the IP address and also mention the DNS server address. Click OK and Close the screen.
The initial server configuration is complete.
Installation of Active Directory Domain Services
To set up Active Directory, you first need to install Active Directory Domain Services on your Windows Server. After the installation, the server can be promoted to a Domain Controller. Here are the steps to follow:
From the dashboard.
Click on Add Roles and Features. A new screen will open.
Click Next
At Select Installation Type, select Role-based or feature-based installation.
Click Next.
Select a server from the server pool. In Server Pool, make sure that your local computer is selected.
Click Next.
Select Active Directory Domain Services checkbox from Roles.
Click Next.
Next, you’ll be prompted to add the required features.
7. Click on Add features to proceed.
Click Next
Make sure you read the information on the Active Directory Domain Services dialog.
Click Next
In the Confirmation dialog, click Install to install the selected roles, role services, and features on your server.
The installation process will start. Once it’s finished, click Close to exit the wizard.
Promote Your Server to Domain Controller
When the installation is complete, click Notifications in Server Manager.
Click the link titled Promote this server to a domain controller.
Once the Active Directory Domain Services Configuration Wizard dialog opens, select Add a new forest and enter the Root domain name.
In the Domain Controller Options dialog, leave Forest functional level and Domain functional level enabled as default.
Provide a secure password (kamatera@2024) for Directory Services Restore Mode.
Click Next
Note: Ignore the warning given on the DNS Options dialog.
Select Next.
Verify your server’s NetBIOS domain name (SAMPLETESTDOMAI) and select Next.
Select Next.
Specify the locations for the following:
AD DS Database folder
Log Files folder
SYSVOL folder
Unless you have a specific enterprise use case, it’s advisable to leave everything as default.
Review your selections carefully, and once satisfied, click Next to proceed.
The installation wizard will perform validation of prerequisites before proceeding with the installation of AD DS. Once all the checks are passed successfully, select Install to initiate the installation process.
Indeed, like magic, the installation process will commence. Let’s hope for a smooth and successful installation!
Once the installation is complete, click Close to finish the wizard. The system will restart.
Your Active Directory Services have now been installed successfully. Your machine will be rebooted automatically to apply the changes.
Adding an Active Directory Account
Your Active Directory account will have rights to enterprise admins, schema admins, and domain admins.
First, sign in as the domain administrator.
Open Server Manager and click on the tools menu active directory.
A new screen will open. Go to the folder with your domain name and then to the Users folder. Click on the icon to create a new user.
A new screen will open:
Fill in the required details and click Next.
Set a password for your account and uncheck the first checkbox User must change password at next logon. Click Next.
Click Finish.
The user will be redirected to add rights to the created account.
Double-click on the account to provide rights for the newly created user.
Under the Properties screen, select Member Of tab and Click Add. A new screen will open.
Enter the name for the object, then click on the Check Names tab.
Object name as Enterprise, when you click on Check names, select Enterprise Admins.
Object name as Schema, when you click on Check names, select Schema Admins.
Object name as Domain, when you click on Check names, select Domain Admins.
Click on Apply and then Ok.
Now the Active Directory Server is configured.
Installing Microsoft Exchange Server
You need to have 2 servers with Windows Server Operating system installed. One of the servers should be assigned to Active Directory Domain Service.
Initial Setup and Requirements for Exchange Server Installation
Prepare Two Servers:
You need two servers with Windows Server operating systems installed.
Assign one server to the Active Directory Domain Services role.
Download an ISO image of the latest version of Exchange Server 2019 from the Microsoft website.
Include the Exchange Server in the Domain:
The server where Exchange will be installed should be included in the domain.
Install the necessary additional software. Visit the Microsoft website for detailed information and download the required components.
Install Required Components:
Visual C++ 2012:
Install the Visual C++ 2012 Redistributable.
Unified Communications Managed API:
Install the Unified Communications Managed API 4.0 Runtime.
URL Rewrite Module:
Install the URL Rewrite Module for IIS.
.NET Framework:
Install the required version of the .NET Framework. After the installation, the operating system will prompt you to restart the server. Choose to restart later as other components need to be installed first.
Install Required Tools and Components
Start PowerShell as Administrator:
Open PowerShell with administrative privileges.
Install Remote Administration Tools:
To prepare Active Directory for the installation of Exchange, install Remote Administration Tools using the following command:
Add Required Components for Lync Server or Skype for Business Server:
Run the following command to install the necessary components:
Install Extra Components Required for Exchange Server Operation:
Run the following command to install additional components:
Restart the Computer:
After installing the components, restart the computer to apply the changes.
Include the Exchange Server in the Domain
Add DNS and Change Server Name:
Press the key shortcut Windows + X.
Choose Network Connections.
Configure Network Settings:
Right-click on your network adapter and select Properties.
Select Internet Protocol Version 4 (TCP/IPv4) and click Properties.
Set a static IP address, subnet mask, and default gateway.
Enter the preferred and alternate DNS server addresses.
Change the Server Name:
Right-click on the Start button and select System.
Click on Change settings next to the computer name.
Click Change and enter the new name for your server.
Click OK and follow the prompts to restart the server.
After these steps, your Exchange Server should be properly configured and included in the domain, with DNS set up and the server name changed.
Include the Exchange Server in the Domain
Configure Network Settings:
Choose Network Connections:
Press the key shortcut Windows + X.
Select Network Connections.
Change Adapter Options:
Click on Change adapter options.
Right-click on the network adapter and select Properties.
Select Internet Protocol Version 4 (TCP/IPv4) and click Properties.
Set DNS by using the Active Directory domain server’s IP address as the DNS server.
Click OK.
Change the Server Name:
Open System Info:
Press the key shortcut Windows + X.
Select System.
Access Remote Settings:
Click on Remote settings on the left-hand side.
Computer Name:
Click on the Computer Name tab.
Click Change and enter the new name for your server.
Click OK and follow the prompts to restart the server.
After these steps, your Exchange Server should be properly configured, included in the domain, and connected to the Active Directory domain server.
Final Steps to Include Exchange Server in the Domain
Change the Computer’s Name and Include in the Domain:
Change Computer Name:
Click on the Change button in the Computer Name tab.
Change the computer’s name to the desired name.
Check the box to include the computer in the domain.
Enter the domain address.
Specify Login Credentials:
After entering the domain address, you will be prompted to specify the login and password for the Active Directory account that belongs to the Enterprise Admins, Schema Admins, and Domain Admins groups.
Connect Exchange Server to the Domain:
Restart the Server:
Once the Exchange Server is connected to the domain, the operating system will ask you to close all programs and restart the server.
Follow the prompts to restart the server to apply the changes.
Mount Exchange Server ISO and Start PowerShell
Sign In:
Sign in with the account that belongs to the Enterprise Admins, Schema Admins, and Domain Admins groups.
Mount the Exchange Server ISO:
Mount the ISO image of Exchange Server that you downloaded earlier.
Open the disk containing the file.
Right-click on the ISO file and select Mount.
Start PowerShell as Administrator:
Open PowerShell with administrative privileges.
Navigate to the mounted disk by specifying the disk letter (e.g., D:).
Extend the Schema for Exchange:
Run the following command to extend the schema for Exchange:
After running these commands, your Active Directory schema will be extended, and your Active Directory will be prepared for the Exchange Server installation.
Prepare Domain and Create Exchange Organization
Prepare Domain
To prepare the domain for the installation of Exchange Server, use the following command:
/PrepareDomain prepares the domain for Exchange Server installation.
/NewProvisionedExchangeServer creates the Exchange organization with the specified organization name.
Make sure to replace “YourOrganizationName” with your actual organization name during the Exchange organization creation process.
Finally, you can begin the installation of Microsoft Exchange Server.
Open the Mounted Disk:
Navigate to the mounted disk containing the Exchange Server installation files.
Run the Setup File:
Go to This PC, select the drive and double click on Microsoft Exchange Server is installed and run the file named Setup.exe.
Begin Installation:
In the installation wizard that opens, check for updates if prompted and click Next.
View Exchange Server Information:
The wizard may offer you the option to view information about Exchange Server 2019. Click Next to proceed.
To proceed with the installation of Exchange Server 2019:
Accept License Agreement:
Accept the license agreement by checking the appropriate checkbox.
Click Next:
Click Next to proceed to the next step.
Configure Error Reporting (Optional):
If you prefer not to send error reports to Microsoft automatically, select “Don’t use recommended settings.”
Click Next:
Click Next to continue with the installation process.
After configuring error reporting settings, you should:
Select the Mailbox role option.
Check the option for automatically.
Install Windows Server Roles and Features:
Ensure that the required Windows Server roles and features for Exchange Server are selected.
Click Next to proceed.
Select Installation Directory:
In the window to select the installation directory, leave the default directory unchanged.
Click Next to continue with the installation process.
Configure the malware protection settings in accordance with your organization’s policies and security requirements.
After configuring malware protection settings, the installation process will begin to check if everything is ready for installation:
Ensure that the preparation of the organization and the server role have been checked successfully.
If errors are detected, the only button displayed will be the “Retry” button. Address any detected errors and repeat the installation process.
If everything has been set up correctly as per this tutorial, there should be no errors. Instead, you will see the “Install” button.
Click on the Install button to initiate the installation of Exchange Server.
After the installation finishes:
It’s recommended to restart the computer. You can do this later.
Check the box next to “Launch Exchange Administration Center” after finishing Exchange setup.
Click Finish to complete the setup process.
For server management, you will use the Exchange Administration Center (EAC). You can access it using the following link format, where https://expc/ecp should be replaced with the name or IP address of your Exchange Server:
To access the Exchange Administration Center:
Open a web browser.
Enter the name or IP address of your Exchange Server followed by /ecp in the address bar.
Press Enter to navigate to the Exchange Administration Center login page.
Enter the Domain name and Password and click sign in.
This will open an exchange center panel. To make sure that exchange has been installed successfully, run the following commands in Exchange Management Shell.
Click on start Microsoft Exchange Server 2019 Exchange Management Shell, and use the following commands:
To verify and gather information about your Exchange Server installation using Exchange Management Shell, you can use the following commands:
Get-ExchangeServer:
This command lists information about Exchange servers in your organization, including their names, roles, and other details.
Get-ExchangeServer
Get-ExchangeServer -Status:
This command provides additional detailed information about the Exchange servers, including their status.
Get-ExchangeServer -Status
Test-ServiceHealth:
Use this command to test the health of Exchange services and verify that they are running correctly.
Test-ServiceHealth
Create Users in Active Directory:
Use Active Directory Users and Computers to create user accounts for individuals who will have mailboxes.
Configure Network Connectors:
Set up network connectors to enable Exchange Server to communicate with external mail servers and services.
Add Data on External Virtual Folders:
Configure virtual directories such as OWA (Outlook Web Access) and ECP (Exchange Control Panel) for external access.
Configure External DNS:
Ensure that your external DNS records (MX, SPF, DKIM, etc.) are properly configured to route email traffic to your Exchange Server.
Create a Certificate:
Obtain and install an SSL certificate to secure communication between clients and Exchange Server.
Set Up AutoDiscover:
Configure AutoDiscover to automatically configure email clients and enable seamless account setup.
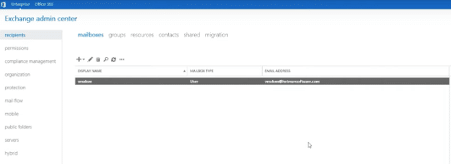
To create a mailbox for a user:
Open Exchange Administration Center (EAC):
Access the EAC by navigating to https://expc/ecp (replace expc with your Exchange Server’s name or IP address) and sign in with appropriate credentials.
Create a New Mailbox:
In the EAC, navigate to “Recipients” and click on “Mailboxes.”
Click on “New” (+ icon) to create a new mailbox.
Follow the prompts to select the mailbox type (user, room, equipment, etc.), specify the user, and configure additional settings as needed.
Complete the mailbox creation wizard.
Assign Permissions:
After creating the mailbox, assign appropriate permissions to users as per organizational requirements.
Click on the + sign and select Mailbox.
Select the organizational unit where to include this user by clicking on browse
Select the Organizational Unit (OU):
Choose the location within Active Directory where you want to place the user by navigating and selecting the appropriate OU.
Specify User Logon Name:
Enter the desired login name for the user’s mailbox in the “User logon name” field.
Set Password and Configure Options:
Proceed to set the password for the user and click on “More options” for additional settings.
Choose Mailbox Database:
Under the “Mailbox database” section, click on “Browse” to select the database where the new mailbox should reside.
Save Changes:
Finally, click on “Save” to complete the process and create the mailbox.
The created mailbox will now appear in the mailboxes tab. You can use these credentials to log into your mailbox.
In the mail flow, click on Accepted domain, which is a domain used by an exchange organization to send and receive mail traffic by default.
After deployment, if necessary, you can add another domain or configure the existing domain for your specific needs.
Click Send Connectors
After deployment, if necessary, you can add another domain or configure the existing domain for your specific purposes. After that, you need to add a send connector in your Exchange infrastructure. Send connectors are essential for managing incoming and outgoing mail flow on Exchange servers and facilitating communication between services in the transport pipeline. This setup allows your mail infrastructure to interact seamlessly with external systems via the SMTP protocol.
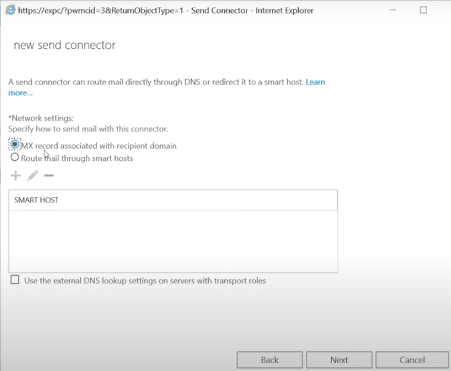
To create a new send connector:
Open the Exchange Administration Center (EAC).
Navigate to the “Mail Flow” tab.
Click on “Send connectors.”
Click the plus (+) icon to add a new connector.
Name the Connector:
Provide a name for the new connector.
Select Internet Option:
Check the option for “Internet” to designate this as an internet connector.
Specify Sending Method
On the next page, specify how emails should be sent:
Choose “MX record” to route emails using DNS MX records, which direct email using the SMTP protocol. This is commonly used for general email sending.
Alternatively, choose “Smart host” to route emails through a specific SMTP server designated to handle outgoing mail. This option is useful for scenarios where all outgoing mail should route through a dedicated server.
Complete Configuration:
Follow the prompts to complete the configuration, ensuring all settings align with your organization’s email routing requirements.
Now, specify for which domains the new connectors will work:
Click on the plus (+) icon to add a new domain specification.
Type an asterisk (*) instead of a domain name. This indicates that the new send connector will handle all domains except your own.
Save the configuration.
Click Next.
Next, after specifying for which domains the new send connector will work, follow these steps:
Specify on which server the send connector should be created:
Click on the plus (+) icon.
Choose your Exchange Server from the list.
Click OK.
Finish creating the connector:
Complete any additional configuration settings as required.
Click “Finish” to finalize and create the send connector.
At this stage, you should configure DNS records for your domain. To do this, open a web browser and access the control panel to manage your external DNS records. I’ll demonstrate using the Cloudflare service. For more information on how to do this, refer to our DNS configuration documentation.
Configuring Connectors and Client URLs
Open the Servers section
Go to the Servers tab
Select Edit
Go to the Settings section and select Outlook Anywhere.
Set an external domain that corresponds to your mail server’s internet-accessible address in the Exchange Server configuration.
Navigate to the Virtual Directories tab.
Click on the range symbol. A new screen will open.
Click the + symbol to add your external domain.
Enter your external domain in the field provided.
Click Save to apply the changes.
Note: the external domain will appear in the settings of each virtual folder. By default, Exchange Server uses the MAPI protocol for mail services. The settings you have modified should suffice for this mail protocol configuration.