phpBB, stands for PHP Bulletin Board, is a flexible open-source forum software that allows users to create and manage online discussion boards. phpBB offers a feature-rich environment with extensive customization options. With its user-friendly interface, strong moderation tools, and support for multiple extensions, phpBB is well-suited for communities of all sizes and purposes. Hosting phpBB on Kamatera, a cloud service provider known for its scalable virtual machines, ensures flexibility and performance.
This guide will walk you through the entire process of setting up a phpBB forum, covering installation, configuration, and best practices. It provides the knowledge and tools needed to create, manage, and grow your online community using this versatile forum application.
First, let’s create an account on Kamatera.
Go to console.kamatera.com and sign up for an account by providing the following information:
Verify Your Email: Click the verification link sent to your email by Kamatera.
Password: Enter your password.
Repeat Password: Re-enter your password and click Create Account.
Access the Kamatera Management Console
Enter your username and password and click login to access Kamatera Management Console.
2. Navigate to My Cloud on the left pane, select Servers and click on Create New Server.
3. Choose zone
Choose a zone from the following options:
Asia
North America
Europe
Middle East
Note: For this setup, we used the Asia server domain to set up the Windows Server.
4. Choose An Image
Kamatera offers a variety of app and server images to help users set up preconfigured resources. Users can explore options such as
Server OS Images
Desktop OS Images
App Images
Service Images
My Private Images
In this, select App Images and select phpBB.
5. Choose the latest version of phpMyAdmin.
Note: Always select the latest version.
Once the version is selected you can see message as: “phpBB bulletin board solution installed and ready to use on Ubuntu Server 20.04 LTS”
6. Toggle the Detailed view button to enable you to view the detailed description, including the price.
For this use case, below Server Specifications are used. So, select the Server Specs according to your requirements.
Choose Server Specs
Field
Description
Type
Type B-General Purpose: Server CPU are assigned to a dedicated physical CPU thread with reserved resources guaranteed.
Type D–Dedicated: Server CPU are assigned to a dedicated physical CPU Core (2 threads) with reserved resources guaranteed.
Type T-Burst: Server CPU are assigned to a dedicated physical CPU thread with reserved resources guaranteed. Exceeding an average usage of 10% will be extra charged for CPUs usage consumption.
Type A-Availability: Server CPUs are assigned to a non-dedicated physical CPU thread with no resources guaranteed.
Note: More information on CPU types is available on the My Cloud-Pricing page.
CPU
Choose the number of vCPUs that will be installed on the server. Type B/T can be configured with up to 104 vCPUs per server. Based on Intel’s latest Xeon Processors, 2.7 GHz+.
RAM
Choose the amount of RAM that will be installed on the server. Type B/T/D can be configured with up to 512GB RAM per server.
SSD DISK
Choose SSD Storage Size. You can add up to 15 SSD Disk. SSD Storage includes unlimited IOPS and unlimited storage bandwidth, free of charge.
Daily Backup
Toggle the switch to enable extended daily backups of your server’s storage to external backup storage.
Management Services
Toggle the switch to enable managed services to the server’s operating system by Kamatera Technical Support Team.
7. Choose Networking
Users can select the network they wish to use, whether it is a public Internet network or a private local network.
Simple Mode
Field
Description
Public Internet Network
Check to connect the server to a network interface connected to Public Internet Network.
Private Local Network
Check to connect the server to a network interface connected to Private Local Network.
Advanced Mode:
Field
Description
NIC #1
Select WAN from the options available in the drop-down menu.
WAN
LAN
New LAN
Select auto from the options available in the drop-down menu.
Auto
Network
Select auto from the options available in the drop-down menu.
Auto
IP
WAN Traffic
Select 5000 GB per month/ on 10 Gbit per second port.
8. Advanced Configuration
Hide: to hide the advanced configuration.
Show: to see the advanced configuration.
Field
Description
Install Script
Enter the script here to execute once the server is created.
Note: For Windows system use Power Shell.
Keep Server On Failure
Do not terminate server if start up script or provisioning fails
Server Notes
Enter any server notes to be noted.
Tags
Select the Tags from the drop-down menu and click Add Tag.
9. Finalize Settings
Finalize settings by setting the password, re-validating it, selecting the number of servers, specifying the server’s name, and enabling the Power On Servers option.
Field
Description
Password
Select password
Password allowed characters: a-z, A-Z,0-9 !@#$^&*()~ and must need the following requirements:
At least 14 characters
At most 32 characters
At least one lowercase character
At least one upper case character
At least one number
Includes allowed characters only
Validate
Re-enter the password to validate.
Servers
Select the number of servers the user wants.
Name # 1
Enter the name of the server.
Power On Servers
Switch on the toggle button to see the details
Note: Once the user enters the details in Finalize Settings, they can select either the Monthly Billing Cycle or Hourly Billing, depending on their requirements.
10. Billing Cycle and Pricing
The user can choose between a monthly and hourly billing cycle.
Note: The Server Summary displays the location, operating system (including server specifications), add-on services, servers, and pricing.
Click Create Server.
11. In Tasks Queue, you can see the phpBB is downloading.
Once the installation is successful, you will message as Success beside the server’s name and phpBB is reflected in the Server Management dashboard.
Click Open, beside the phpBB server.
12. A new screen shows up.
Overview tab in the center is selected by defaultand itdisplays information about the Server
Overview- Power state, Guest OS, Zone, Public Internet (WAN), Server ID of the server and
Configuration- Number of CPU. Memory Size, Disk 1.
Click on Connect to connect to the server.
13. Now, click on Open Remote Console.
14. In the terminal, enter the username and password that you mentioned while creating a server (step-6).
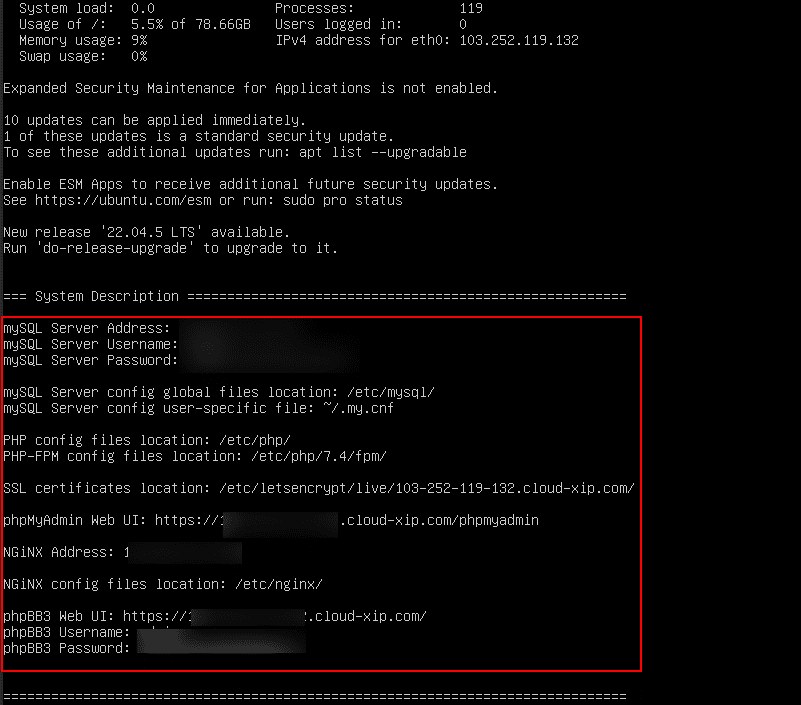
15. Under System Description, you can see MySQL Address, Username, Password, phpMyAdmin Web UI, NGINX Address, phpBB3 Web UI, Username, and Password.
16. Open a browser, enter the phpBB3 Web UI Address, and press Enter to access the forum.
Enter the phpBB3 Username in the Username field and the phpBB3 Password in the Password field.
Click Log in to access your account.
17. Once logged in, you will see various options such as Quick links, FAQ, ACP, MCP, Board Index, Your First Forum, Who is Online, Registered Users, Birthdays, and Statistics.
Quick links: Provides easy access to recent posts, unread messages, and user-specific content.
FAQ: Contains frequently asked questions about using the phpBB forum.
ACP (Administration Control Panel): The admin dashboard for managing forum settings, users, and permissions.
MCP (Moderator Control Panel): A panel for moderators to manage posts, users, and forum moderation tasks.
Board Index: The main page displaying all forums and categories.
Your First Forum: A default forum where users can post and interact.
Who is Online: Shows a list of active users currently browsing the forum.
Registered Users: Displays a list of all registered members of the forum.
Birthdays: Lists members who have birthdays today (if enabled).
Statistics: Provides forum activity insights, including total posts, topics, and users.
18. Under YOUR FIRST CATEGORY, click on Your first forum.
19. You will see the default topic “Welcome to phpBB3” inside Your First Forum.
This is an automatically generated post that appears in a newly installed phpBB forum.
Click on“Welcome to phpBB3”.
20. The Welcome to phpBB3 message provides a brief introduction to phpBB, explaining its features and capabilities. It serves as a sample discussion thread, helping users understand how topics and replies work. Administrators and moderators can edit, delete, or replace this topic as needed.
Click on Post Reply. It allows users to respond to an existing topic within a forum.
21. Clicking on Post Reply button, opens the text editor, where users can compose and format their responses using text styling, images, links, and attachments. Once submitted, the reply is added to the thread in chronological order, making it visible to other forum members. If users have subscribed to the topic, they will receive notifications about new replies. The ability to reply to topics depends on the permissions set by the forum administrator, ensuring that only authorized users can participate in discussions.
22. When you click on the drop-down menu beside the spanner icon. You will see
Subscribe topic: Notifies you via email when new replies are posted in the topic.
Bookmark topic: Saves the topic in your user control panel for easy access later.
Print view: Displays a simplified, printer-friendly version of the topic.
23. Click on the drop-down menu beside the hammer icon.
Lock topic: Prevents further replies to the topic while keeping it visible.
Delete topic: Permanently removes the topic and all its replies from the forum.
Move topic: Transfers the topic to a different forum or category.
Split topic: Divides a topic into two separate threads by moving selected posts.
Move posts: Transfers specific posts from one topic to another.
Merge topic: Combines two topics into a single thread.
Copy topic: Duplicates a topic while keeping the original intact.
Change to Sticky: Pins the topic at the top of the forum for easy visibility.
Change to Announcement: Highlights the topic as an important notice within the forum.
Change to Global: Marks the topic as a global announcement visible across all forums.
View logs: Displays a history of moderator and administrator actions on the forum.
24. As shown in the screenshot below, the highlighted options are called post actions or moderation actions in phpBB. They allow users and moderators to manage posts effectively, ensuring discussions remain organized and relevant.
Edit post: Allows the author or moderators to modify the content of a post.
Delete post: Removes a specific post from the thread (if permitted).
Report this post: Notifies moderators about inappropriate or rule-violating content.
Information: Displays additional details or system messages about the post.
Reply with quote: Inserts the selected post’s content into the reply for context.
25. In phpBB, the ACP (Administration Control Panel) is the central dashboard for managing the forum. It allows administrators to configure settings, manage users and permissions, create and organize forums, customize themes, install extensions, and monitor forum activity. Access to the ACP requires administrator privileges, and logging in may require re-authentication for security purposes.
26. Quick links provide easy access to recent posts, unread messages, and user-specific content. It has different options:
Your posts: Displays a list of all topics and replies you have posted.
New posts: Shows the latest posts made since your last visit.
Unread posts: Lists topics with unread messages based on your last login.
Unanswered topics: Displays topics that have no replies yet.
Active topics: Shows threads with recent activity and discussions.
Search: Allows users to find topics and posts using keywords or filters.
Members: Provides a list of all registered forum users.
The team: Displays a list of forum administrators and moderators.
27. Clicking on the Private Messages option allows users to send and receive direct messages within the forum, without posting publicly. This feature enables private communication between members, supports multiple recipients, and includes an inbox, outbox, sent messages, and message drafts. Administrators can configure private messaging permissions, restrict usage, or disable the feature if needed.
28. When you click on the admin tab, you will see options like User Control Panel, Profile, and Logout.
User Control Panel: Allows users to manage their account settings, preferences, and subscriptions.
Profile: Enables users to update personal information, avatars, and signatures.
Logout: Signs the user out of the forum securely.
29. The “Search this forum” option allows users to search for specific topics or posts within a particular forum.
30. The “Search this forum” option, which has different filters, helps users quickly find relevant discussions within a specific forum. It saves time by narrowing down searches to a particular category or section, making it easier to locate specific topics or information. This feature is especially useful for large forums with multiple categories, ensuring users can efficiently navigate and access the content they need.
Congratulations! You have learned how to set up a form with phpBB on your Kamatera cloud server.